1.博客搭建
https://yyheroi.github.io/2023/08/25/github+hexo%E5%8D%9A%E5%AE%A2%E6%90%AD%E5%BB%BA/
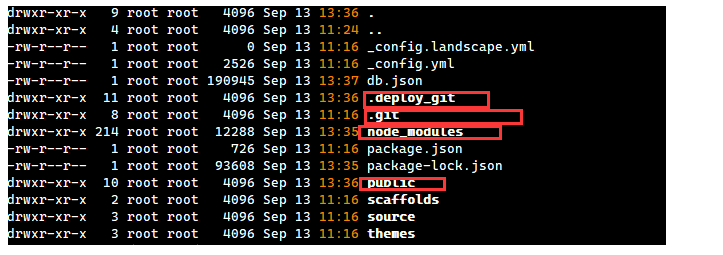
2.创建一个新文件夹new,用于上传hexo博客目录
将以下目录(除了红色方框的目录)拷贝到新目录中
参考:https://blog.csdn.net/K1052176873/article/details/122879462
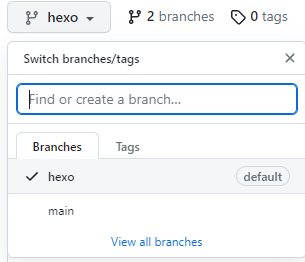
3.github上创建hexo分支并设置为默认分支
创建hexo分支
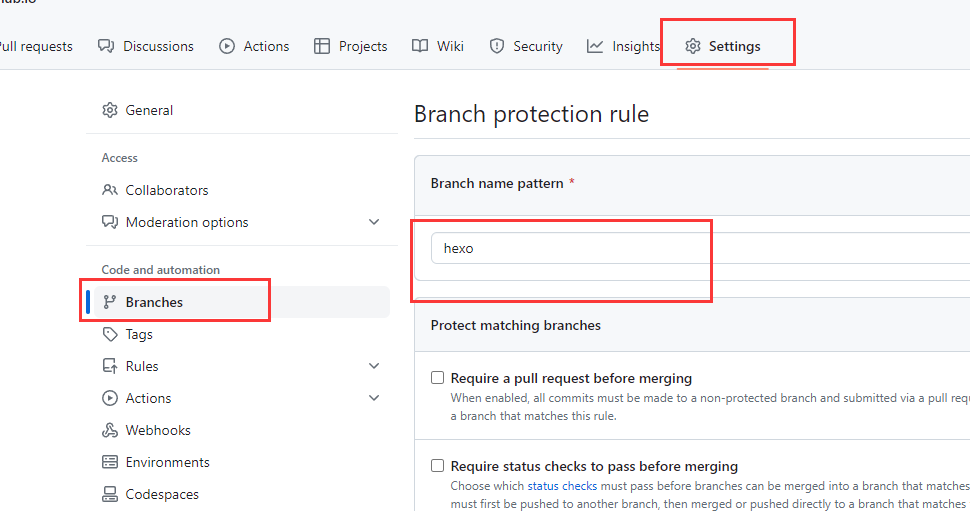
将hexo分支设置为默认分支
4.进入新建的文件夹中git clone,再上传相关文件至hexo分支
基本原理:github仓库开两个分支,main分支存放的是hexo生成的静态页面,hexo分支存放基本的 Hexo 博客项目的结构和默认配置文件,如文章,主题
当需要重新搭建环境时,直接拉取hexo分支中Hexo博客目录以及相关配置文件,当需要更新博客时直接
1 | cd new |
1.clone下来的文件夹内应该有个.gitignore文件,用来忽略一些不需要的文件,表示这些类型文件不需要git。如果没有,右键新建,内容如下:
1 | .DS_Store |
2.如果已经clone过主题文件,那么需要把theme主题文件夹里的 .git 也删除,我这里已经删除了theme主题的.git目录

3.送new目录中的相关文件到远程仓库 hexo分支
1 | git add . |
5.!新环境中快速搭建博客环境!
1.设置ssh
1 | ssh-keygen -t ed25519 -C "your_email@gmail.com" |
2.安装nodejs和hexo
1 | sudo apt update |
3.拉取hexo博客目录
1 | git clone git@github.com:<username>/<username>.github.io.git #<username> 用户名 |
6.遇到的问题
问题1.nodejs版本过低
npm WARN notsup Unsupported engine for hexo@6.3.0: wanted: {“node”:”>=12.13.0”} (current: {“node”:”10.19.0”,”npm”:”6.14.4”})
npm WARN notsup Not compatible with your version of node/npm: hexo@6.3.0
npm WARN notsup Unsupported engine for hexo-front-matter@3.0.0: wanted: {“node”:”>=12.13.0”} (current: {“node”:”10.19.0”,”npm”:”6.14.4”})
npm WARN notsup Not compatible with your version of node/npm: hexo-front-matter@3.0.0
npm WARN notsup Unsupported engine for hexo-cli@4.3.1: wanted: {“node”:”>=14”} (current: {“node”:”10.19.0”,”npm”:”6.14.4”})
npm WARN notsup Not compatible with your version of node/npm: hexo-cli@4.3.1
npm WARN notsup Unsupported engine for hexo-log@3.2.0: wanted: {“node”:”>=12.4.0”} (current: {“node”:”10.19.0”,”npm”:”6.14.4”})
npm WARN notsup Not compatible with your version of node/npm: hexo-log@3.2.0
npm WARN notsup Unsupported engine for abbrev@2.0.0: wanted: {“node”:”^14.17.0 || ^16.13.0 || >=18.0.0”} (current: {“node”:”10.19.0”,”npm”:”6.14.4”})
npm WARN notsup Not compatible with your version of node/npm: abbrev@2.0.0
npm WARN notsup Unsupported engine for hexo-fs@4.1.1: wanted: {“node”:”>=14”} (current: {“node”:”10.19.0”,”npm”:”6.14.4”})
npm WARN notsup Not compatible with your version of node/npm: hexo-fs@4.1.1
npm WARN notsup Unsupported engine for hexo-log@4.1.0: wanted: {“node”:”>=14”} (current: {“node”:”10.19.0”,”npm”:”6.14.4”})
npm WARN notsup Not compatible with your version of node/npm: hexo-log@4.1.0
npm WARN optional SKIPPING OPTIONAL DEPENDENCY: fsevents@2.3.3 (node_modules/fsevents):
npm WARN notsup SKIPPING OPTIONAL DEPENDENCY: Unsupported platform for fsevents@2.3.3: wanted {“os”:”darwin”,”arch”:”any”} (current: {“os”:”linux”,”arch”:”x64”})
升级nodejs
1 | wget -qO- https://raw.githubusercontent.com/nvm-sh/nvm/v0.38.0/install.sh | bash #安装 nvm |
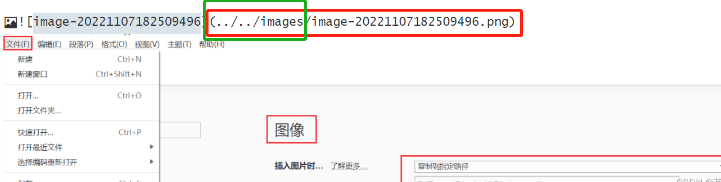
问题2.hexo博客图片不显示
https://blog.csdn.net/QRLYLETITBE/article/details/127737904
1 | npm i hexo-renderer-marked |
新建imgs文件夹
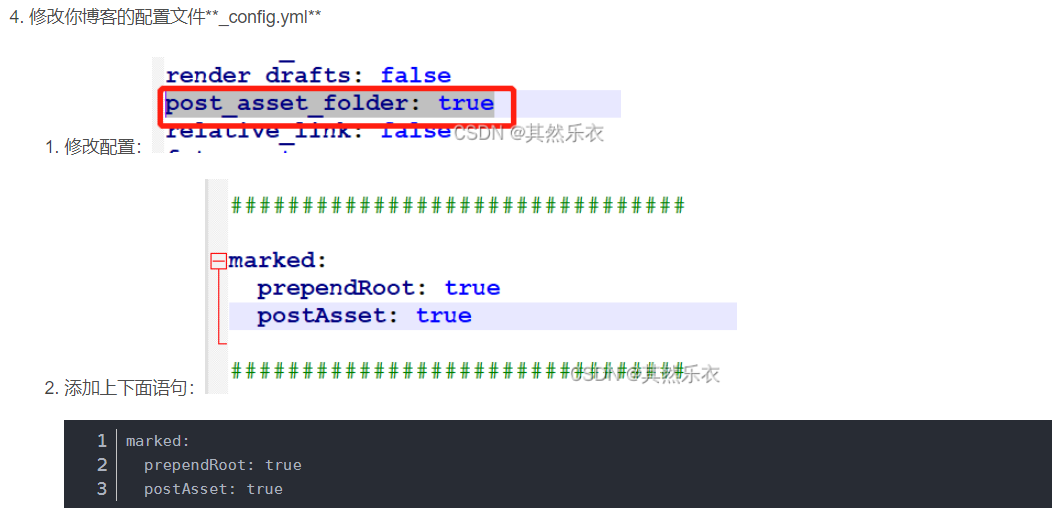
1 | marked: |
修改图片路径
转载请注明来源,欢迎对文章中的引用来源进行考证,欢迎指出任何有错误或不够清晰的表达。可以在下面评论区评论,也可以邮件至 yengii@qq.com